If you are interested in learning how to safely install anti-humidity plates on your own, saving time and money, don’t miss this complete tutorial.
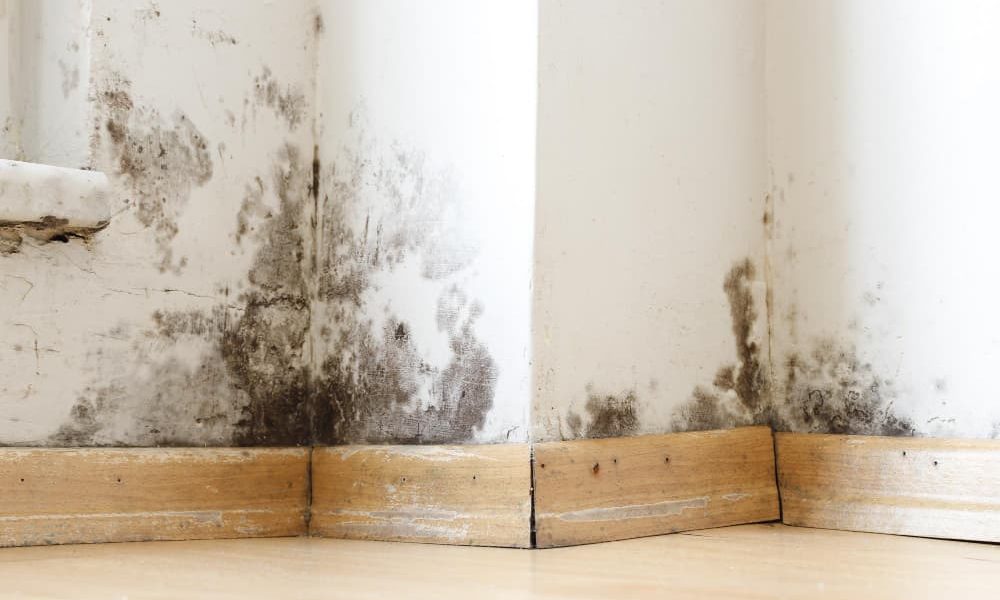
The dampness on the walls Not only is it an aesthetic problem, but it can also affect the health and structure of your home. Anti-humidity plates They are a practical and efficient solution to combat this problem.
In this article, we will guide you step by step in the process of placing these plates, ensuring a long-lasting and effective result.
What are anti-humidity plates
Anti-humidity plates are a relatively recent invention that has revolutionized the way of treating humidity problems in buildings. Originated as a practical solution to combat rising damp and condensation, these plates have evolved in terms of materials, types and technologies.
Generally made of materials such as plaster, cement, or polymeric compounds, they are designed to be installed on walls or ceilings, acting as a barrier against moisture.
There are different types, including insulating and decorative plates, which not only protect against humidity but also improve the aesthetics of the space. Its advantages are multiple: from preventing the growth of mold to improving the thermal and acoustic insulation of rooms.
Step 1: Surface Preparation
Wall inspection and cleaning
Before beginning the installation of anti-humidity plates, it is crucial to carry out a thorough surface inspection and preparation. This involves making sure the wall is completely clean, dry, and free of mold or mildew.
If you find signs of mold, it is essential to treat the area with specific products to eliminate it, since mold is not only harmful to the structure but also to health.
Leveling and repairing imperfections
Once the wall is clean, it is important to check and correct any surface irregularities. The imperfections such as lumps or indentations can hinder the correct adhesion of the plates.
For this, you can use putty or plaster to fill and level any imperfections, ensuring a smooth and uniform surface, ready for the installation of the plates.
Step 2: Installing the plates
Choosing the right adhesive
Select the correct adhesive It is a key step in the installation of anti-humidity plates. You should opt for an adhesive that is specifically designed for the type of board you are using.
The correct choice of adhesive will ensure a strong and long-lasting adhesion, avoiding future problems related to humidity.
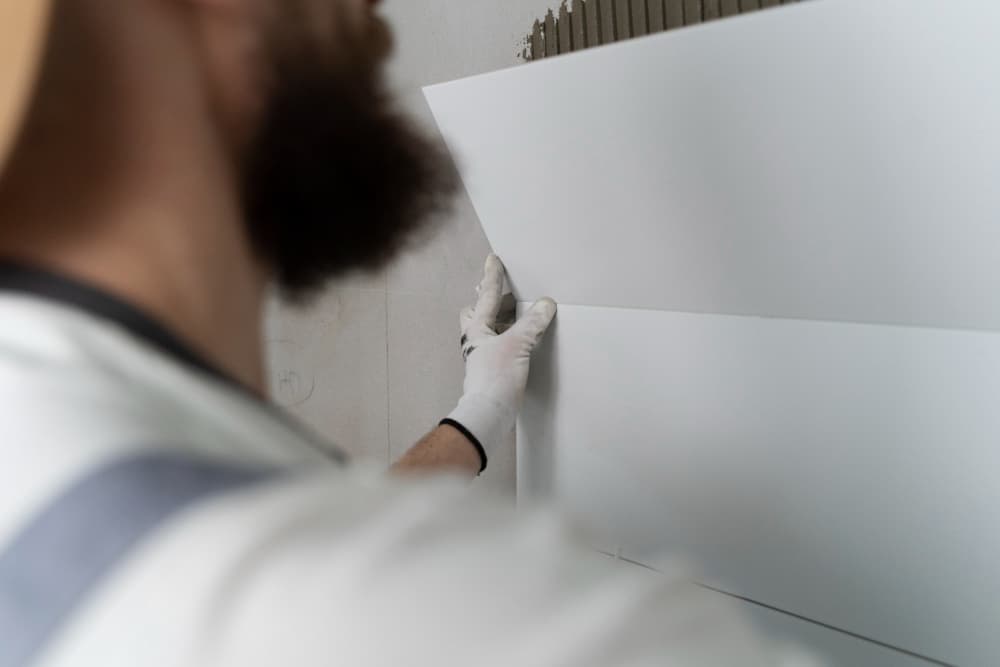
Placing and fixing the plates
The placement of the plates should start from one corner of the room, making sure the plates are perfectly aligned and level. It is vital to apply even pressure on each board to ensure good adhesion to the wall.
Continue placing the plates side by side, cutting them to size to fit the size of the wall.
Step 3: Finishing and Sealing
Review and touch-ups
Once all the plates are installed, perform a meticulous review to make sure they are all firmly adhered to the wall.
Fill any gaps or joints between the plates with putty, providing a smooth, uniform finish, ready for the final step.
Joint sealing
He joint sealing It is crucial to ensure that moisture does not infiltrate through them.
Uses a sealant of quality, applying it carefully to seal all the joints between the plates. This will help maintain the integrity of the wall and prolong the life of the damp proof boards.
Maintenance and aftercare
Painting and decoration
Once the plates are completely dry and firmly fixed, you can proceed to paint or decorate them.
It is important to use paints and decorations that are compatible with the anti-humidity plates, so as not to compromise their protective function.
Regular maintenance
To guarantee the effectiveness and durability of the anti-humidity plates, it is advisable to carry out regular inspections and maintenance.
Keep the surface clean and periodically check for signs of moisture, ensuring that the plates continue to perform their protective function effectively.
Your house, finally free of humidity
Installing damp proof boards is an effective way to protect your home against damage caused by humidity.
By following these steps, you can ensure a successful installation, improving not only the aesthetics of your home, but also its environmental health.
Remember that prevention and regular maintenance are key to a lasting solution. Enjoy an atmosphere healthier and more comfortable In your home!
Knowing how to eliminate moisture that rises from the ground is not easy: today we will provide you with Read more

Discover how to care for an orchid with our expert guide, covering everything from proper lighting to disease prevention. Read more

If you have run out of ideas, but you want to know how to decorate a Christmas tree with tinsel, Read more

Are you thinking about installing a wood-finish tile sandwich panel in your house or porch? Don't miss these ideas, tips Read more

